LAYOUT OF DRAWING SHEETS
The preparation of a neat, beautiful and appropriate drawing depends to a large extent on the layout of drawing sheets. The standard rules and conventions of layout of drawing sheets as recommended by Bureau of Indian standards through their specifications must be followed by the engineer. Apart from it, the engineer should know the office requirements for indicating special aspects.
A layout for drawing sheets includes margin around the drawing sheet and setting the space for title block. The space for margin may vary on different sizes o sheets, but the space for title block is generally fixed. The title block is repeatedly given on every drawing so that the information through the title block facilitates easy and quick reading of drawing.
LAYOUT OF DRAWING SHEET:
After selecting the size of the drawing sheet and to divide the proper space for margin, title block, parts list, revision panel, folding marks and selecting a suitable scale on the drawing sheet is known as layout of drawing sheet.

DIVIDING DRAWING SHEET INTO ZONES:
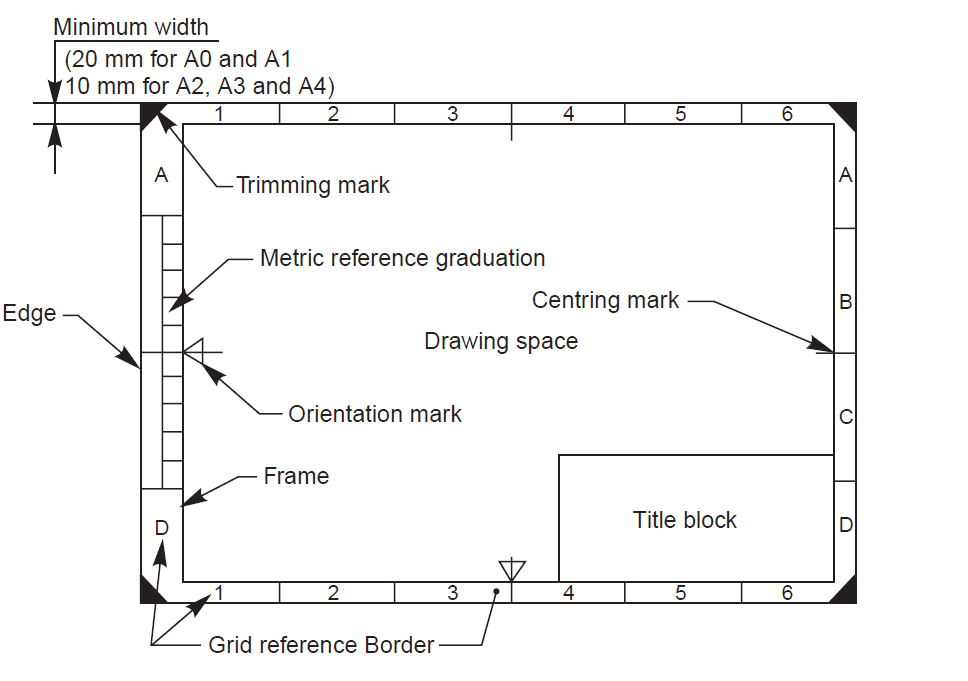
The purpose of marking zone on drawing sheet is to indicate the relevant location in a drawing where some modification or alteration has been subsequently incorporated. The zoning system is popularly adopted on commercial drawing to pin point change in original drawing.
For this purpose. the length of longer side o drawing side is divided into equal number parts and marked 1, 2, 3, 4 etc. The shorter side (on both sides) of drawing sheet is also divided into equal spaces and marked alphabetically (A, B, C, D, E … etc.). The area of alteration on drawing can be indicated by extending the number zone and alphabet zone to coincide at the altered site.
MARGIN:
The space between extreme outside boundaries and the working space is a margin provided around the sheet by drawing margin lines. The margin facilitates easy filing and binding. The margin ensures that if the sheet edge becomes damaged by handling, the drawing within the margin enables prints to be trimmed. Prints after trimming conforms to the sizes of trimmed sheets.
TITLE BLOCK:

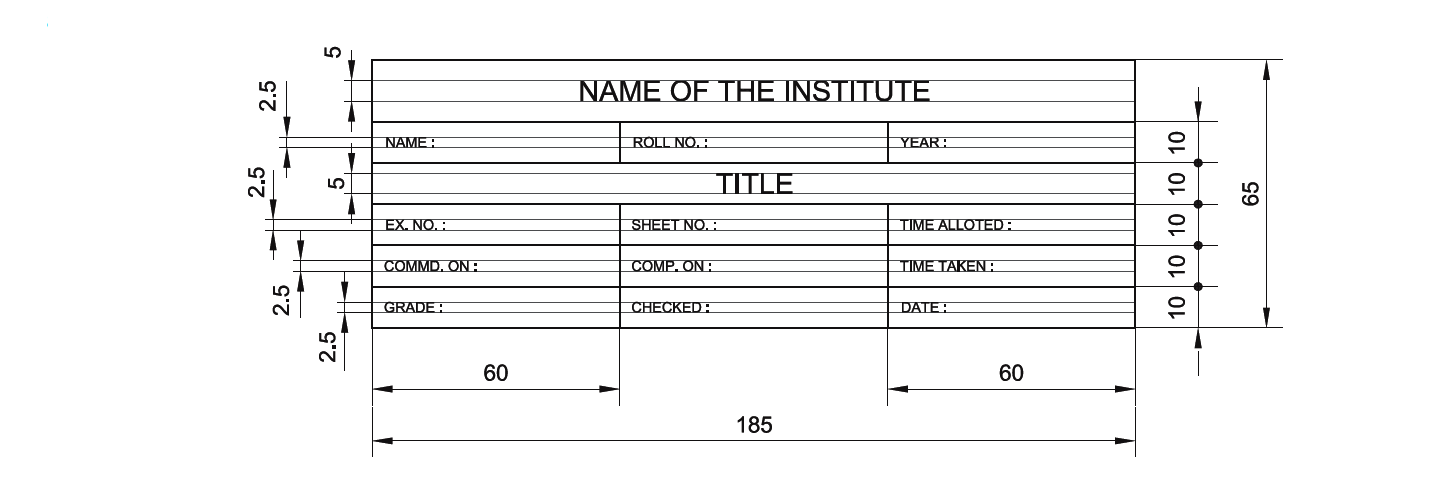
The title space should be within the drawing space. The title block is a recommended space of size 185 mm x 65 mm and should be placed at the right hand bottom corner of the sheet. The title block is an important feature, because it contains the following information:
- Name of title of drawing.
- Drawing and sheet number.
- Scale used.
- Symbols denoting the method of projection.
- Name of the firm.
- Dated initials of staff designing, drawing, checking for standards and approving.
- The material from which the part is made and it finish.
FOLDING MARKS:
Folding marks are to made on the drawing sheet to facilitate of prints in an easy manner.
BORDERS AND FRAMES:
Borders enclosed by the edges of the trimmed sheet and the frame limiting the drawing space should be provided with all sizes. It is recommended that these borders have the minimum width of 20 mm for A0 and A1 and a minimum width of 10 mm for size A2, A3 and A4.
CENTERING MARKS:
Four centering marks should be provided on all drawing in order to facilitate the positioning of the drawing when reproduced or microfilmed.
GRID REFERENCES:
The provision of grid reference system is recommended for all sizes in order to permit easy location on the drawing of details, additions, modifications, etc. The number of divisions should be divisible by two and be chosen in relation to the complexity of the drawing. It is recommended that the length of any side of the rectangle comprising the grid shall not be less than 25 mm and not more than 75 mm. The rectangles of the grid should be referred by means of capital letters along one edge and the numerals on the other edge.
ITEM REFERENCES:
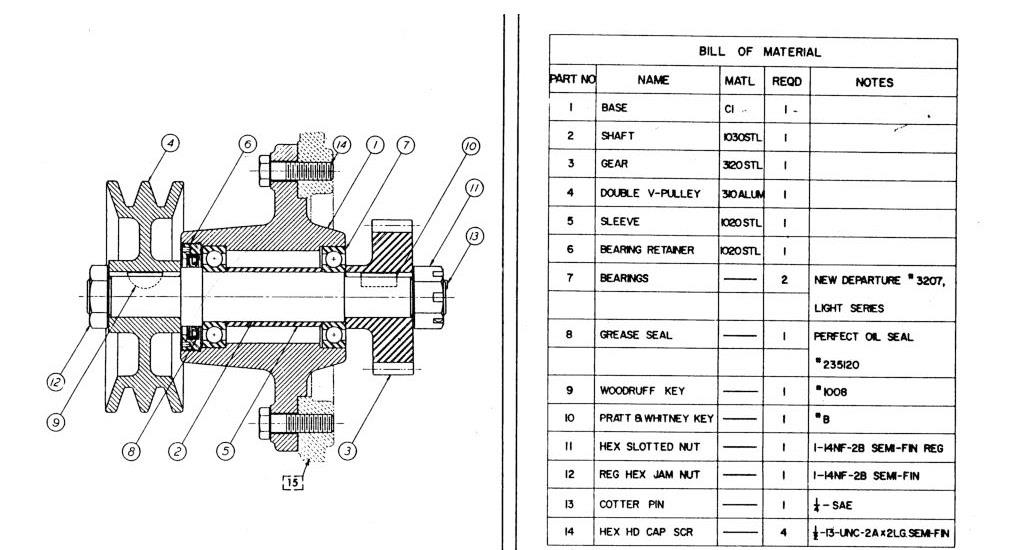
The item references should be assigned in sequential order to each component part shown in assembly and/or each detailed item on the drawing. Further identical parts shown in the same item reference.

Item references should be composed of Hindu-Arabic numerals only. All items references on the same drawing shall be clearly distinguishable from all other indications. This can be achieved by :
- using characters of a larger height.
- encircling the characters of each item reference. In that case all such circles shall have the same diameter and to be drawn with continuous thin line.
- combining the above two methods.
The item references should be placed outside the general outlines of the items concerned and each item reference should be connected to the associated item by a leader line. Leader line should not intersect, should be kept as small as practicable, and should be drawn at an angle to the item references, the leader line should be directed towards the centre of the circle. Item reference of related items may be shown against the same leader line. While the item references identical items need only be shown once, provided there is no risk of ambiguity.
ADDITIONAL INFORMATION:
After completing the drawing sheet details, the additional information if specifically necessary to mention, must be recorded so that, the drawing is complete and self contained as far as possible. The information should cover the following:
- List of material for assembly and details.
- Quantity of numbered parts for assembly and details.
- Job number or order number.
- Complete specification of material.
- Key to machining and other symbols used in the drawing.
- Treatment, finish, marks, tolerance on dimensions.
- Other information regarding manufacturing procedures and relevant special requirement.
REVISION PANEL:
The revision panel means that the drawing should record all additions and alterations which have been incorporated in the drawing from time to time. To record the revision, one revision panel is drawn at the top right hand corner of the sheet. In the columns, the revision number or letter, date zone and signature of approving authority are given.
NUMBERING OF SHEETS:
If there is more than one drawing sheets to complete the assembly and detail to complete one drawing, the numbering on each sheet should show the numbers of the particular sheet. For instance, if there are four sheets to cover one drawing, then the first sheet shall be numbered as below:
Sheet 1 of 4 or 2 of 4
This sheet number should be recorded below the drawing in the space meant for sheet number.
RELATED VIDEOS:
For More Information- CLICK HERE
